creation date: 2025-01-22 19:58
status: note
tags: Clinical & Communication Skills, Directed Independent Learning
POCUS
Introduction to POCUS
Intro
- POCUS > RADUS for:
- At bedside
- Guide needle/removal of foreign body
- Rapidly done
- Real time interpretation
- Easy to repeat
- Answer targeted questions
- Blood?
- Is there AAA?
- Is there cardiac tamponade?
- Is there miscarriage?
- POCUS does not replace RADUS, but acts as an excellent adjunct to the clinical findings
Physics
- US waves 2-10 million Hz
- At density change, reflection of waves return to transducer
- Greater change in density at media border = greater reflection
- Brighter US image between tissue changes
- Impedance = loss of sound waves through a medium
- Shade of grey in image reflected by impedance
- Fluid has low impedance → low reflection → shows up black/darker
- Anechoic = reflects little/none
- Can use fluid filled organs to “see through them”; eg. full bladder before uterus ultrasound
- Bone has high impedance → high reflection → shows up white/bright
- Hyperechoic = reflects everything
- Eg. bones like the spine
- Area behind hyperechoic structure = acoustic shadow
- Greying out behind a solid structure (that is not necessarily hyperechoic)
- Hyperechoic = reflects everything
- Scatter = scattered waves due to gas
- Makes image hard to interpret
Probes
- Curvilinear Probe
- Low frequency
- High depth of penetration
- Low resolution
- Good for most applications
- Large footprint (size of probe space) makes it difficult to squeeze through spaces like the ribs
- Low frequency
- Phased Array Probe
- Low frequency
- High depth of penetration
- Low resolution
- Smaller footprint (good for thorax by going between ribs)
- Sacrifices resolution for capturing motion
- Good for visualizing chambers of heart
- Low frequency
- Linear Probe
- High frequency
- Low depth of penetration (<6 cm from surface)
- High resolution
- High frequency
- Endocavitary Probe
- Transvaginal scans
- Probes will have an indicator to correspond with the US screen
- Convention for radiologists:
- Marking is on left of screen
- On probe, have marking pointed to patient’s right (for transverse plane) or head (for sagittal and coronal planes)
- Note: this is different for cardiologists
Screen orientation
- Near field: top of screen, closest to the probe
- Far field: bottom of screen, furthest from the probe
- Screen left: direction of probe indicator/marking
- Screen right: opposite of probe indicator
Probe movement
- Sliding: moving horizontal or vertical to find structure; note that the probe does not rotate
- Rotating (or twisting): clockwise or counterclockwise
- Fanning (or tilting or fanning): change angle of short axis of probe; to get multiple cross sections
- Heel/Toe (or rocking): changing angle of long axis; toe = rock towards indicator, heel = rock away from indicator
Knobs
- Depth
- Higher depth means computer will “listen” for echos longer → can detect deeper structures
- If the structure of interest is shallow, having a high depth will mean the structure will only be a small part at the near field
- Lower depth means computer “listens” shorter time
- Will magnify the near field
- Balance of magnification and ensuring area of interest is within range
- Start scans with maximum depth and decrease as area of interest is found
- Higher depth means computer will “listen” for echos longer → can detect deeper structures
- Gain
- How sensitive probe is at returning waves
- Low gain = darker
- Generally better for structures like the heart
- High gain = can increase noise
- Better for echogenic structures like the spine
Artifacts
- Objects on screens that aren’t actually there
- Important artifacts to note:
- Acoustic shadow
- Shadow behind hyperechoic structures
- Do not be fooled into thinking it is fluid
- Note bright white boundary of hyperechoic structure
- Refraction/edge artifact
- Shadows directly behind the edges due to waves hitting a smooth, cystic like structure resulting in their refraction and not reflection
- Not fluid!
- Enhancement
- When wave passes through fluid filled structure
- Waves going through fluid is not attenuated (less impedance in fluid compared to tissue)
- Structures behind the fluid filled structure are brighter and appears hyperechoic
- Acoustic shadow
Cardiac POCUS and IVC
Intro
- Does not replace ECHO
- But can be indicated if heart issues
- Note: cardiology/IM convention puts probe indicator on RIGHT
Probe
- Phased Array Robe (2-5 MHz)
- Curvilinear Probe can work too but may not be as ideal
- Use Cardiac preset
Cardiac Views
-
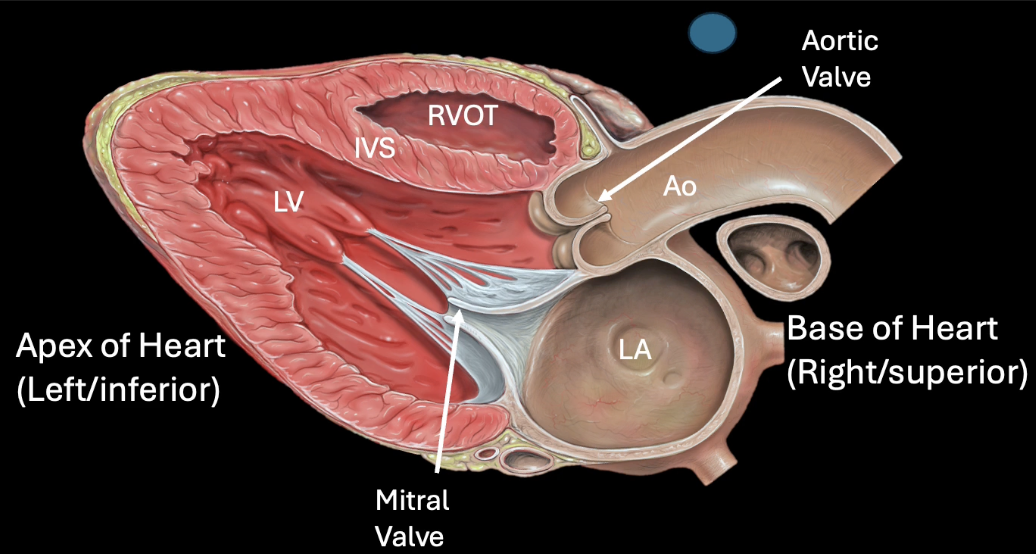
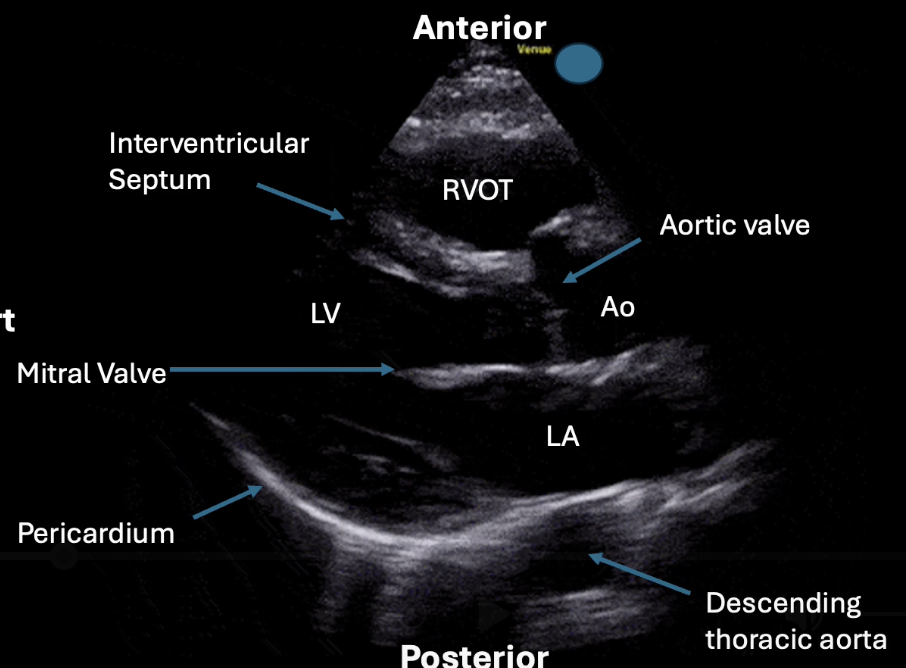
Parasternal Long Axis
- Upper chest (around 3rd-4th intercostal space)
- Just left of sternum (parasternal)
- Direct indicator to right shoulder
- Beam direct posterior
- Slide probe cephalad/caudad
- Example views:
- Findings/investigations
- Pericardial effusion (fluid between the heart and the descending thoracic aorta; bound by pericardium)
- As opposed to left pleural effusion which will be posterior to descending thoracic aorta
- Rules of 3rd’s for diameters of RVOT, aortic route, and left atrium
- Should be roughly 1:1:1
- LV systolic function
- Estimate: grossly normal, moderately depressed, severely depressed, or hyperdynamic LV function
- Based on LV wall thickening during systole (should thicken on contraction), change in LV cavity diameter (normal = collapse by 30-50% during systole), interior mitral valve leaflet “slap” (should come within 1cm of interventricular septum)
- Hyperdynamic = collapse of LV
- Pericardial effusion (fluid between the heart and the descending thoracic aorta; bound by pericardium)
-
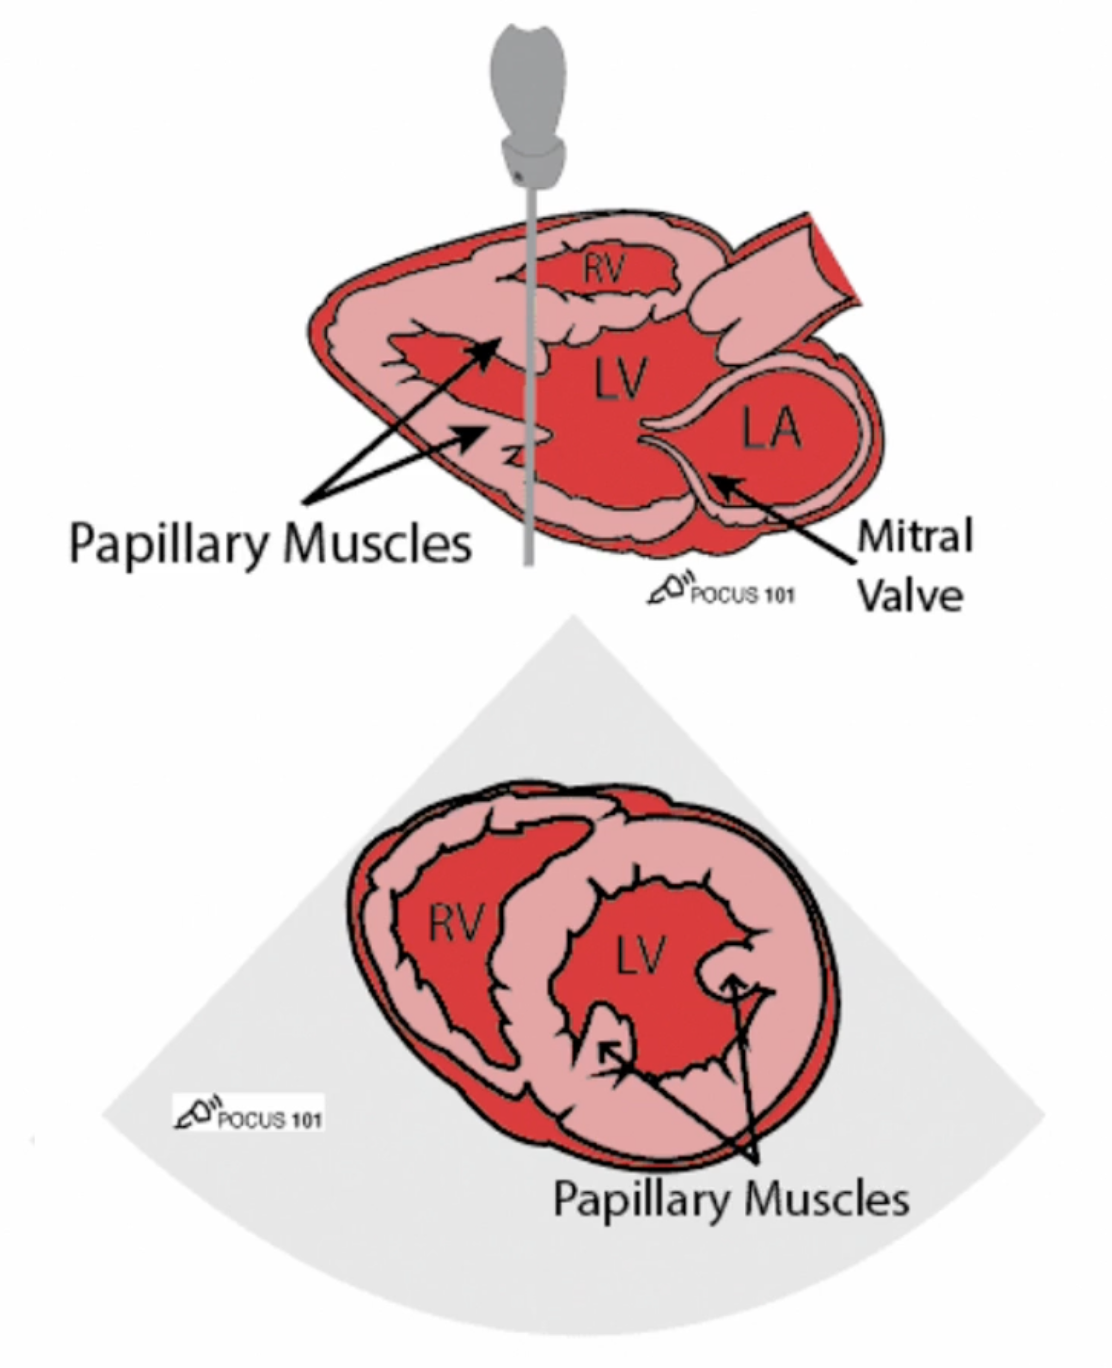
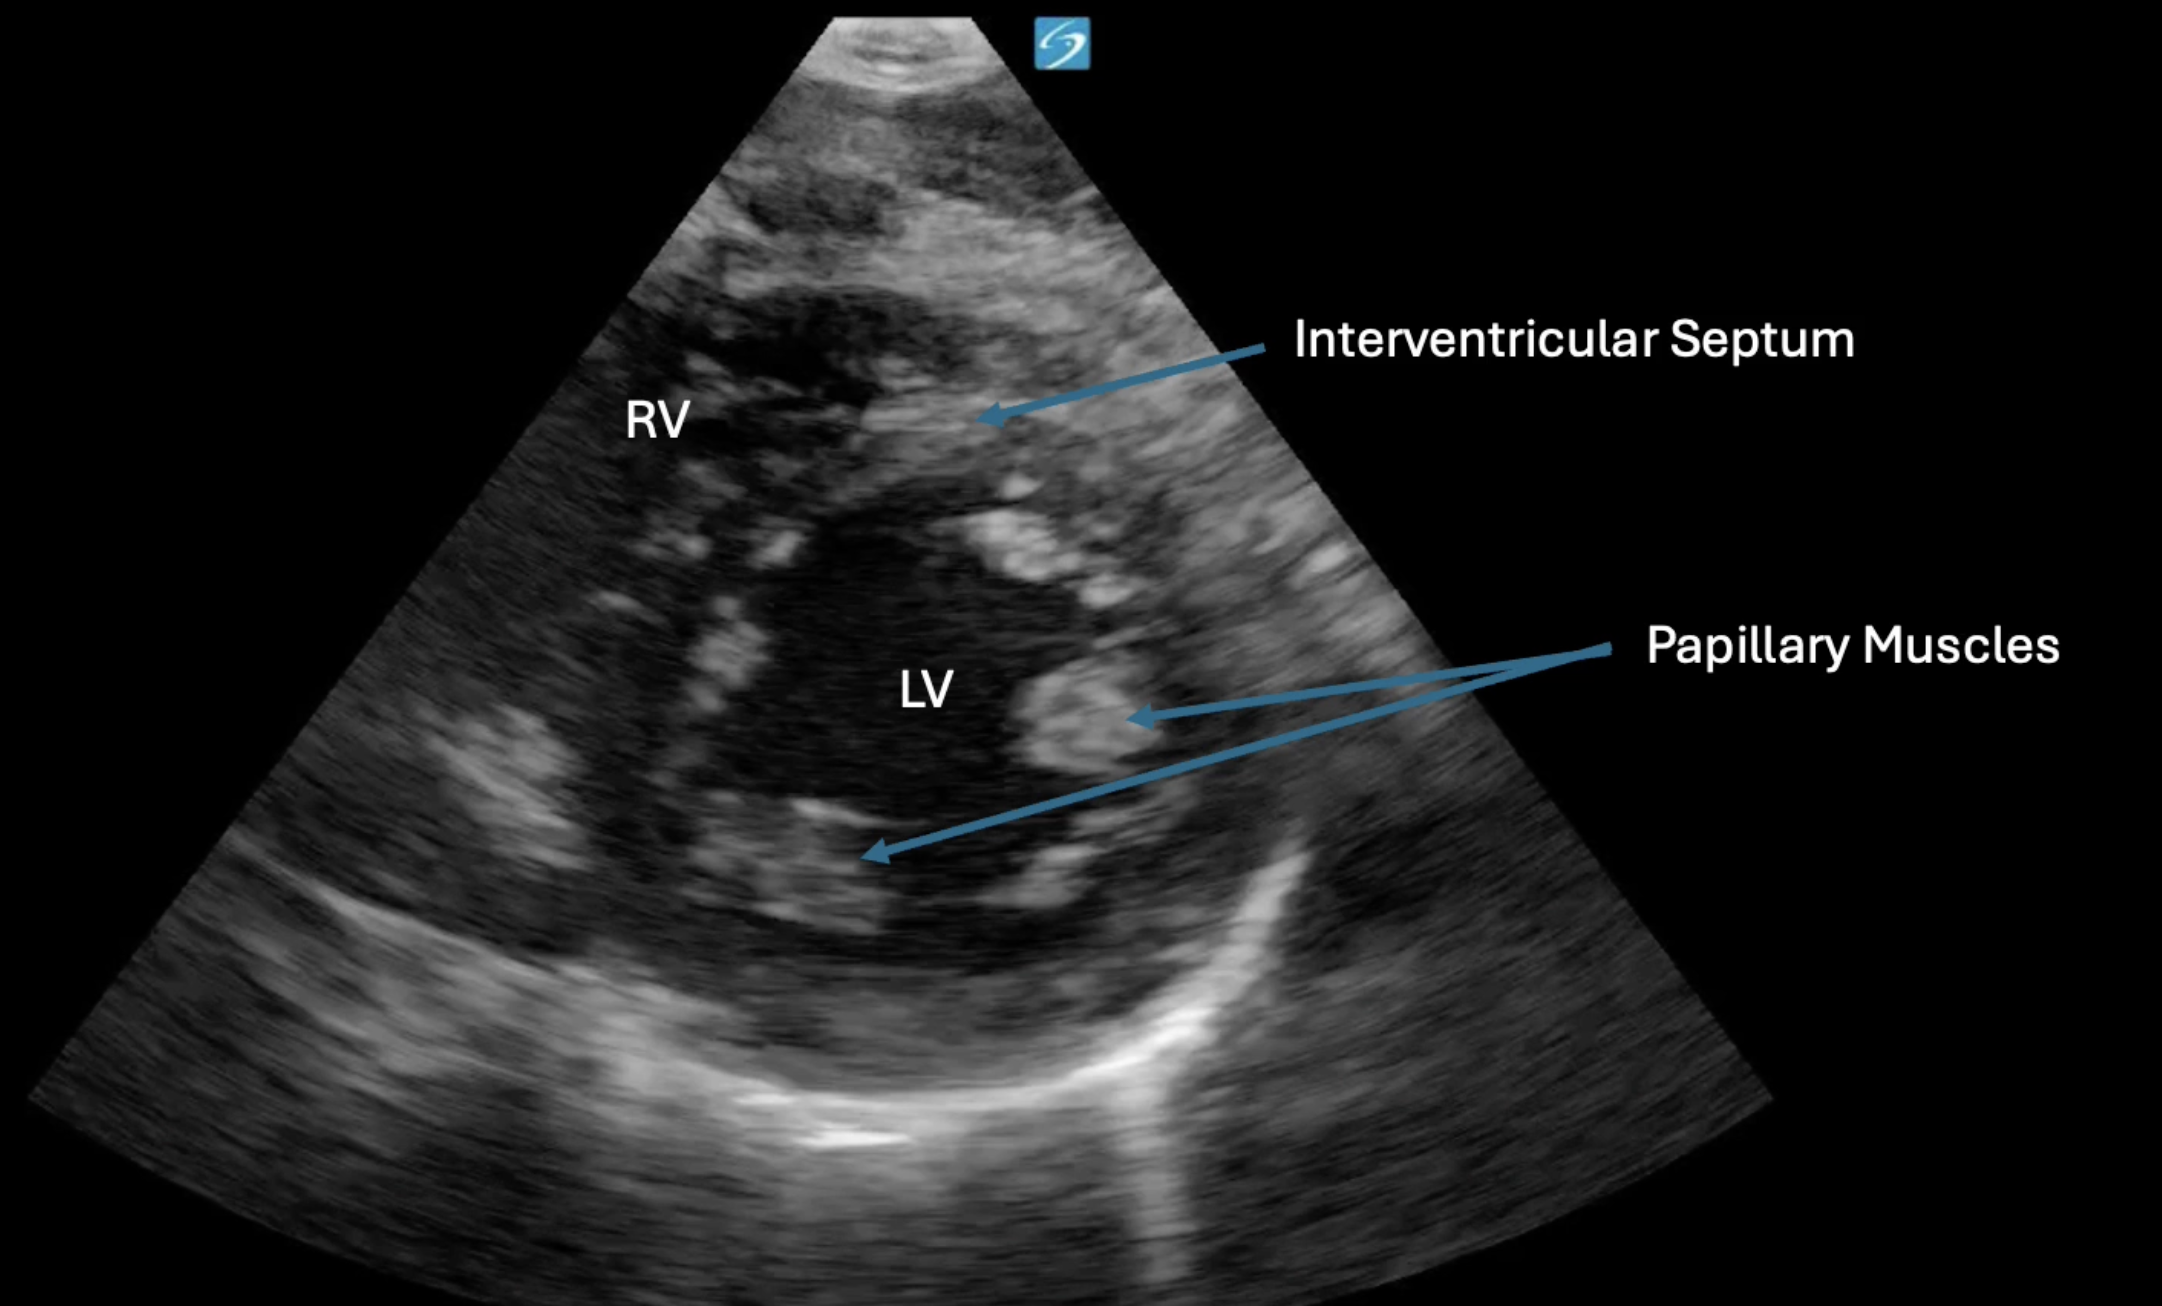
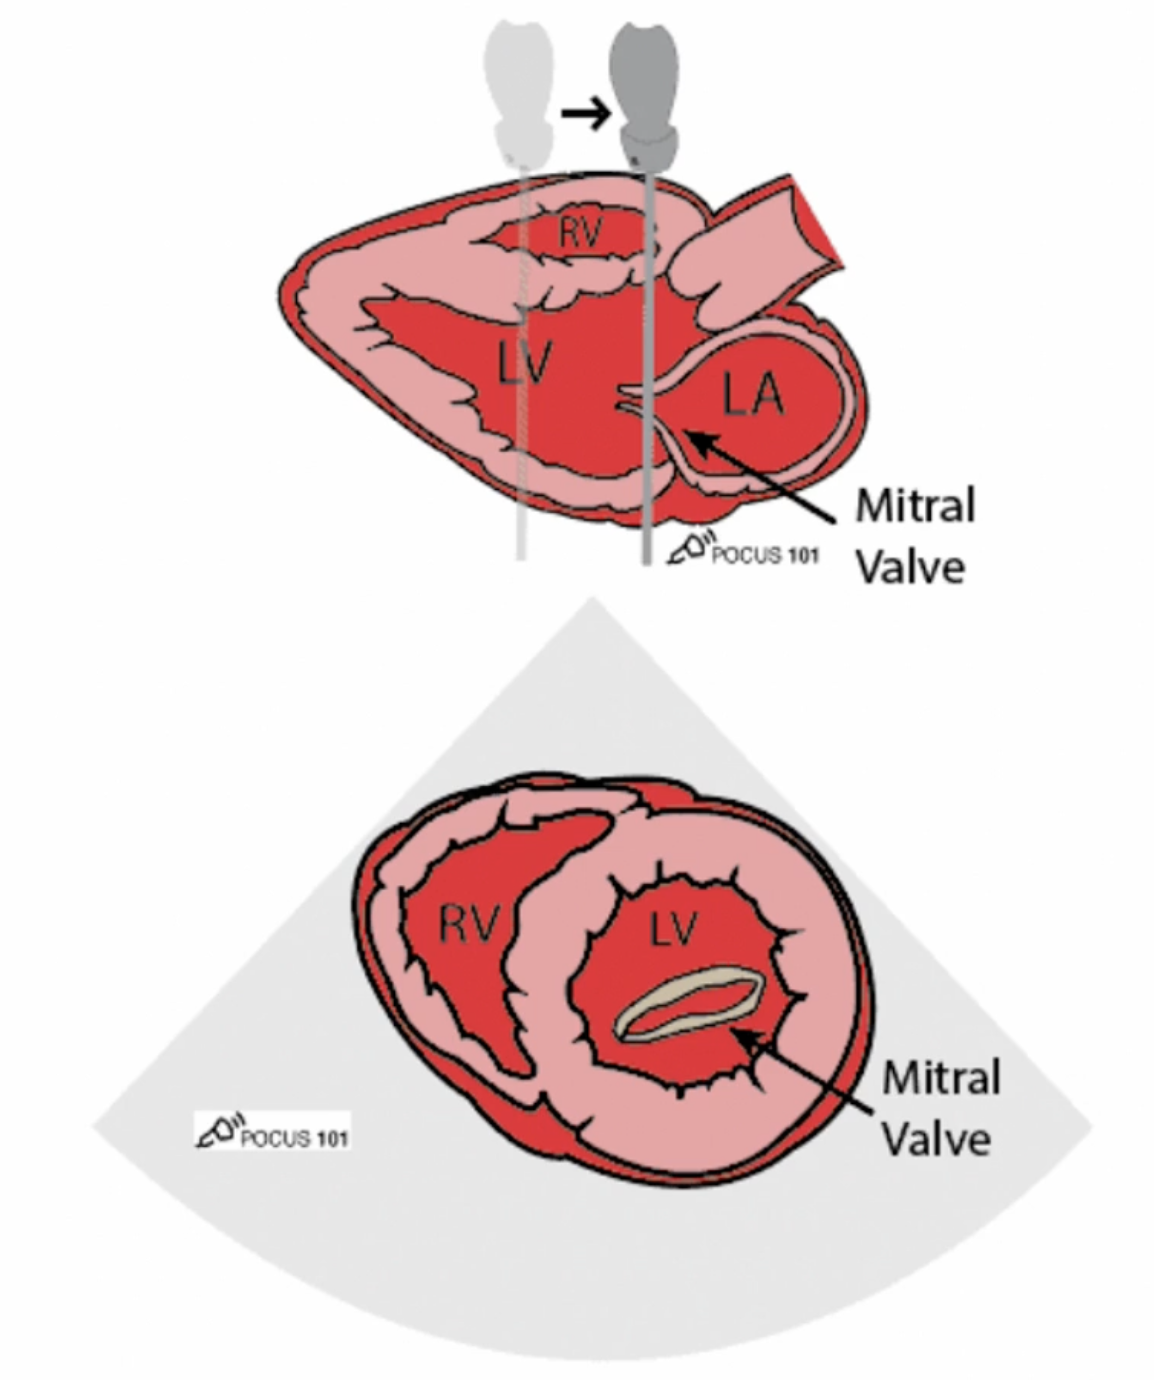
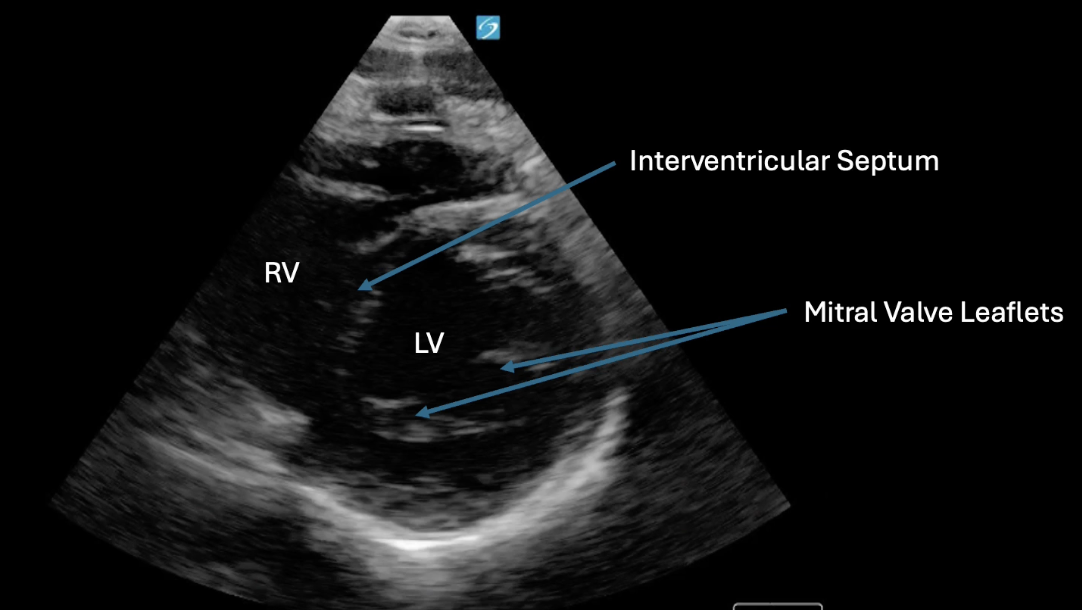
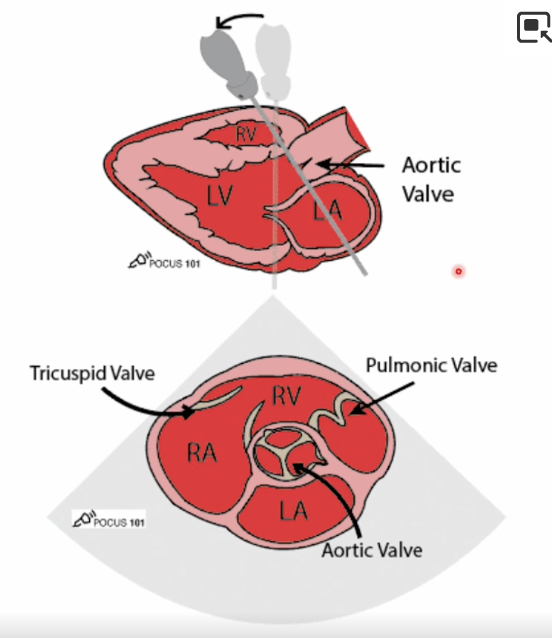
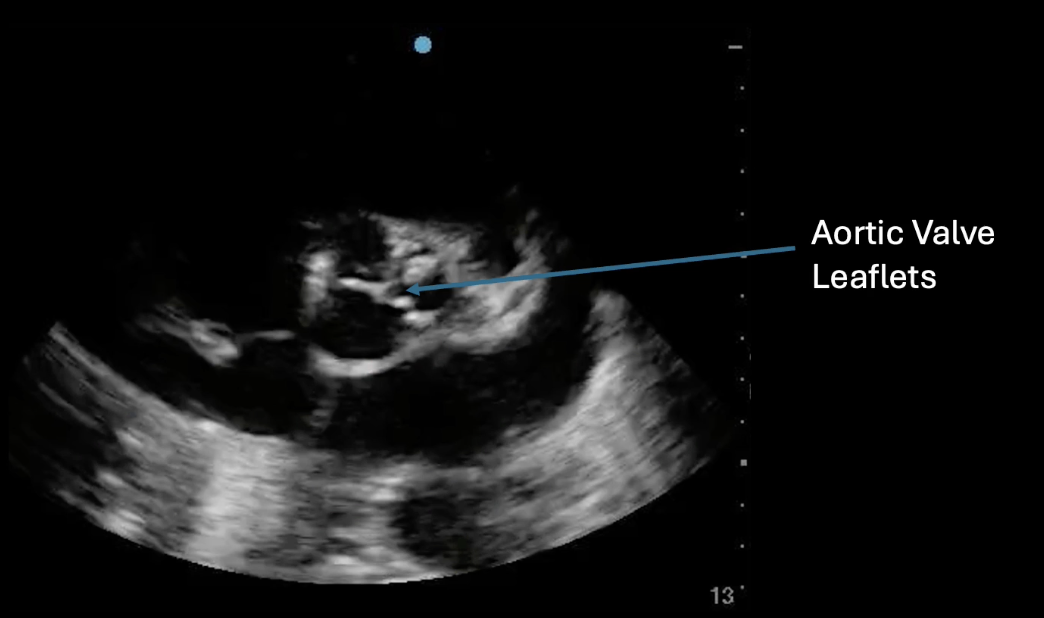
Parasternal Short Axis
- 90 degrees clockwise turn from long axis
- Direct indicator to left shoulder
- Can slide for different cross sections; 3 levels of note
- Mid-papillary level
- Examples:
- 90 degrees from long axis will give this view
- LV should be circular, if oval: rotate probe
- Examples:
- Mitral valve level (“Fish mouth view”)
- Slide probe up towards sternum
- Example views:
- Aortic valve view (“Mercedes benz view”)
- Slide valve superiorly from mitral view
- Example views:
- Findings/investigations
- LV systolic function
- Same concept as long axis (thickening wall, contraction of wall collapsing to centre point)
- Entire wall collapse = hyperdynamic
- Abnormal septal motion
- Indicates increased RV pressure
- Possible obstruction in pulmonary circulation, eg. PE
- Causes IVS to flatten, giving LV “D” shape
- Indicates increased RV pressure
- LV systolic function
- Mid-papillary level
-
Apical 4 chamber
- Place probe near the apex of heart
- 1-2 intercostal spaces below left nipple
- Direct indicator to 2-3 o’clock position
- Aim beam towards left shoulder to visualize all 4 chambers
- Example views:

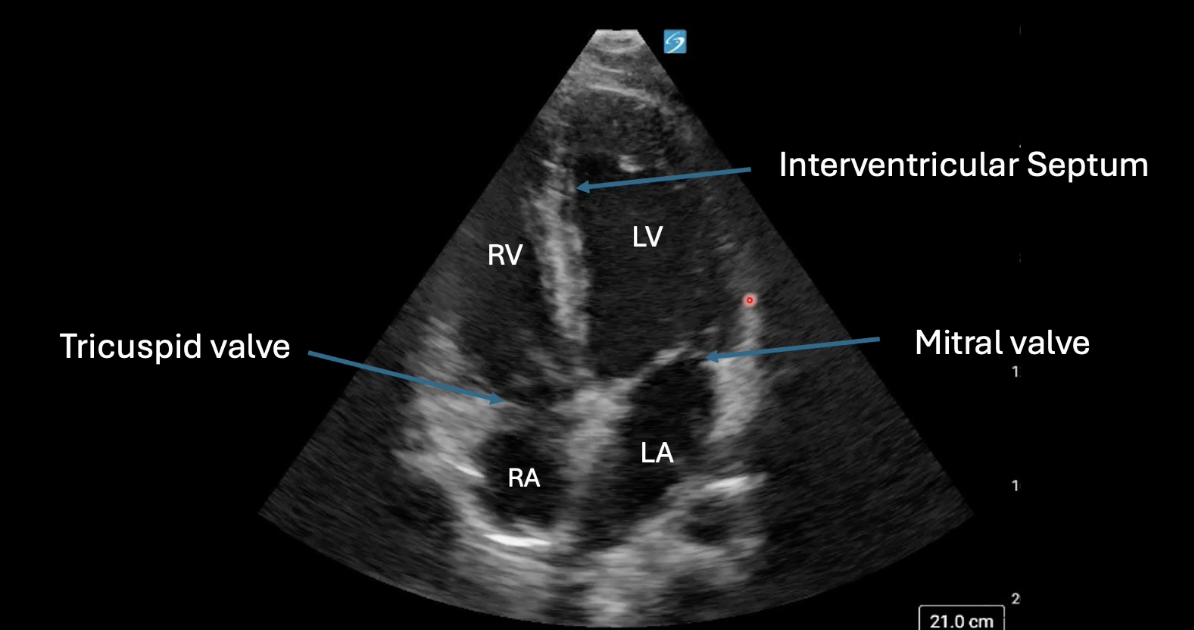
- IVS should be vertical on screen; centre image on LV
- 5 chamber view is possible (5th = LVOT)
- Findings/Investigations
- Chamber size and enlargement/dilatation
- View must have mitral and tricuspid valves
- Normal: RV is 2/3 LV
- Qualitative RV and LV function
- Look for sufficient changing cavity size
- Pericardial effusion
- Fluid can be seen next to chambers
- Chamber size and enlargement/dilatation
- Place probe near the apex of heart
-
Subxiphoid/subcostal
- Place probe just below the xiphoid process
- Direct indicator to 3 o’clock
- Flatten probe against the abdomen to image under costal margin
- Use over-the-probe grip
- Example views:
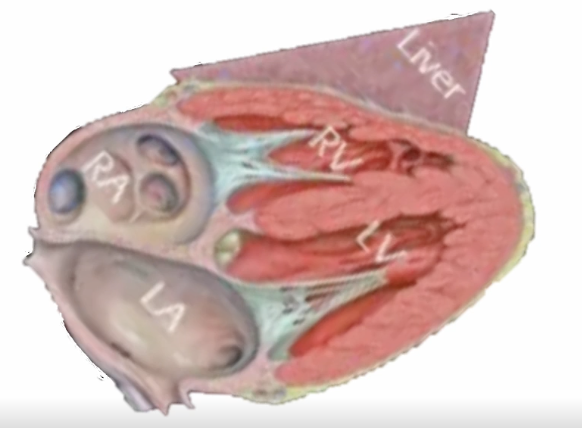
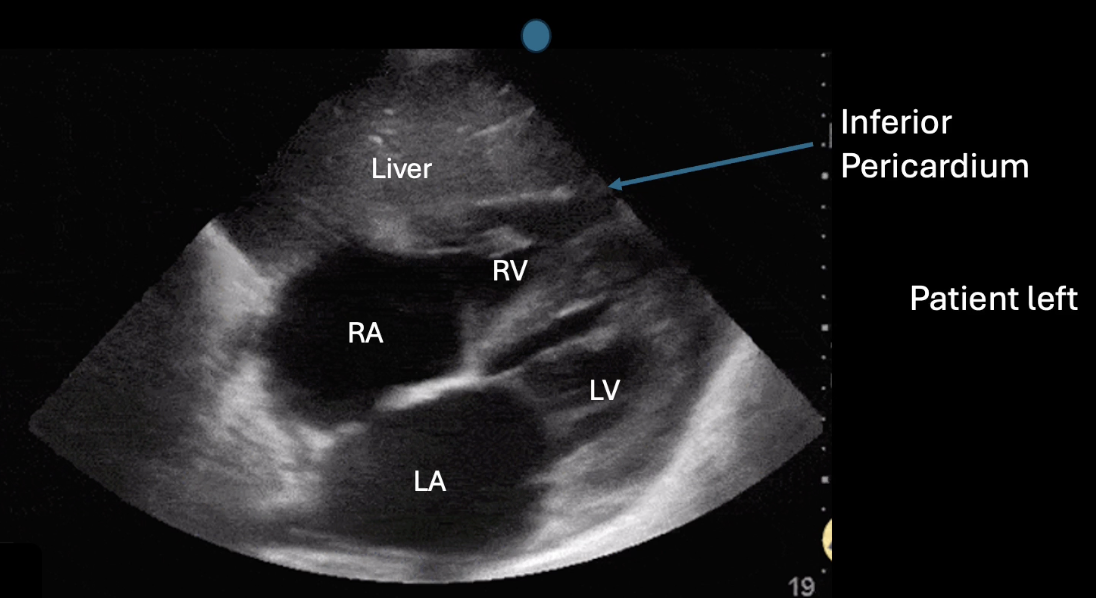
- Liver used as acoustic window
- Similar to A4C view but different orientation
- Findings/Investigations:
- Inferior surface of heart and IVS comes together at the apex of heart to form the a 7; known as the “7 sign”
- Pericardium effusion
- Inferior pericardium should be visualized in its entirety and checked for pericardium effusion
- Sweep anterior to posterior via fanning
- In supine patients, effusions will accumulate posteriorly so fluid pocket seen will increase in size as scan is swept posteriorly
- Note: false positive of epicardial fat pad
- Usually brighter and will disappear in posterior
- LV function
- Change in size and wall thickening can be seen
-
IVC
- 90 degree counterclockwise from subxiphoid position (indicator toward head; cephalad)
- May need to slide to patient’s right slightly
- Example views:
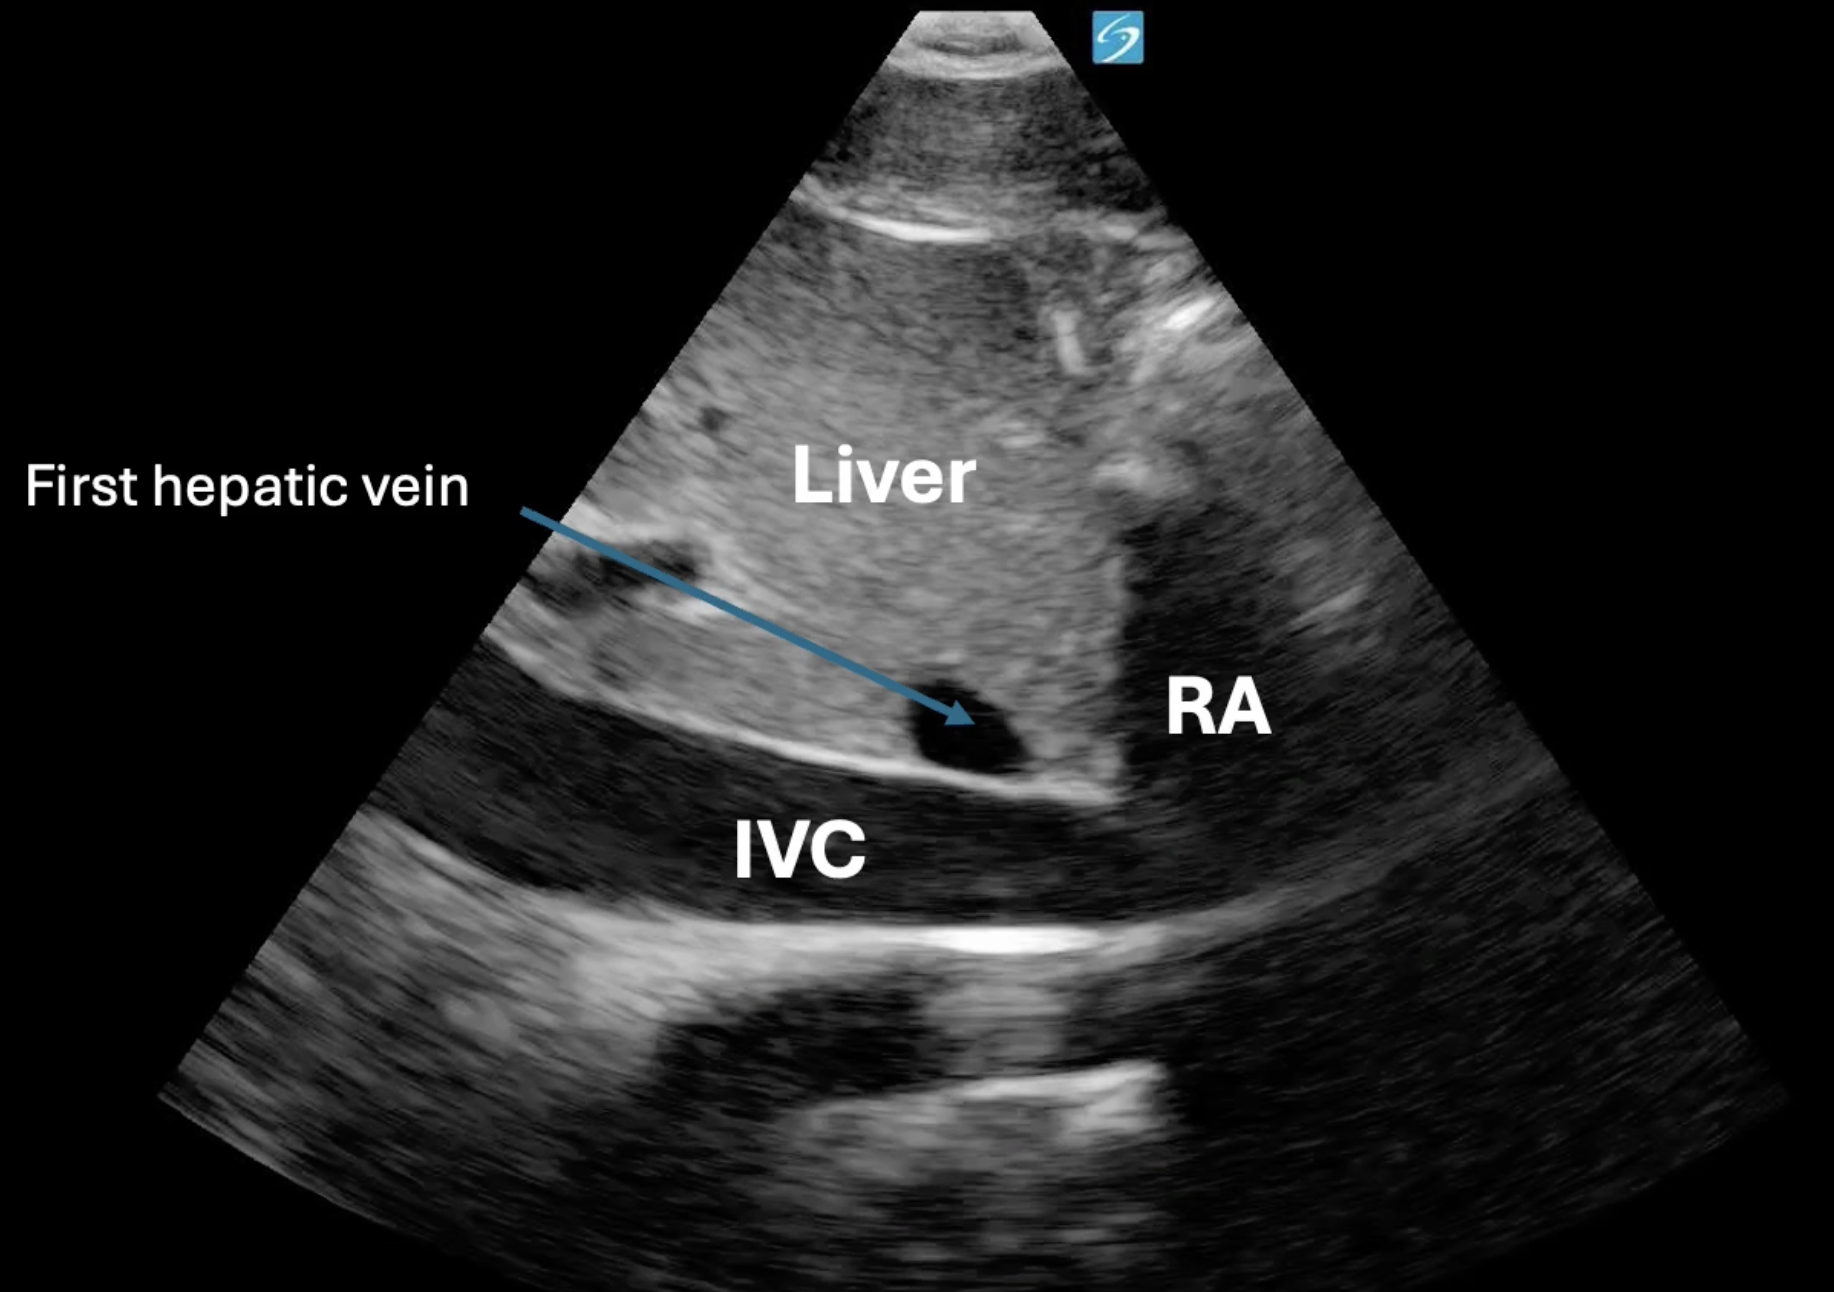
- Findings/Investigations:
-
Respiratory variability
- IVC size changes with respiration; maximal at expiration and minimal at inspiration
- 50% collapse with normal respiration
-
IVC diameter
- Freeze image and measure at largest diameter (at end of inspiration) 1-2 cm laterally from where first hepatic vein inserts
- Normal = 2.1 cm
- Freeze image and measure at largest diameter (at end of inspiration) 1-2 cm laterally from where first hepatic vein inserts
-
Pathology: Plethoric (no collapse + large diameter) vs. flat IVC (collapses completely with inspiration)
-
Shock patients (note: not binary yes/no as with effusion, must correlate clinically for assess volume status)
- Hypovolemia
- Flat IVC
- ≥50% respiratory variability
- Equivocal
- Plethoric IVC (>2.1 cm)
- ≥50% respiratory variability
- Not very useful for fluid status assessment
- Increased right heart pressure/obstructive
- Plethoric IVC (>2.1 cm)
- <50% respiratory variability
- Hypovolemia
-
- 90 degree counterclockwise from subxiphoid position (indicator toward head; cephalad)
Tips/Tricks
- Draping
- Towel across chest/abdomen
- Above drape for parasternal, below drape for A4C and subxiphoid
- Check depth properly
- Optimize pt position
- Bend knees to relax abdomen for subxiphoid view
- Roll pt to left for heart to get closer to surface
- May need to coach breathing
- Parasternal best viewed in full expiration
- Subxiphoid best viewed with full inspiration
- Confirm finding in multiple views